1. Introduction
This is part 1 of a 2 part series. For part 2, please click here.
This article covers how-to:
- Write golang functions for AWS Lambda.
- Use AWS API Gateway to return binary content.
- Link together AWS Lambda & API Gateway to create a scalable HTTPS service for barcode generation.
Why do we need this at PassKit?
- To display a ‘live’ pass-render with accurate barcode in our Pass Designer & Management Tools.
- To generate QR codes (at scale) for our merchants for printing their Loyalty-program enrolment links onto tent-cards, menu’s, websites, Facebook pages, etc.
Why Golang?
- Speed! Very fast & a perfect choice for CPU-intensive tasks.
- Quick & easy to master in a very short amount of time.
- Portability across platforms.
- Compiled binariers: plays nice with Docker.
- Excellent concurreny primitives.
- Well defined error handling patterns.
- Rich standard libraries.
- Standard code formatting / ease of maintenance.
Why AWS Lambda?
AWS Lambda is a cloud computing service that lets you run code without provisioning or managing servers. AWS Lambda executes your code only when needed and scales automatically. In other words, it’s efficient and easy to use at scale, and you only pay for the resources that you use.
What else could this logic be applied to?
- Scalable image generators / manipulators on AWS (although keep in mind that if you’d want to use external image-libraries like Imagick or VIPS – AWS Lambda won’t be your optimal solution).
- Scalable document generator (PDF, Excel files, etc) on AWS.
What is needed to get started?
You will need an AWS account with access to Lambda & API Gateway in order to build this.
2. Samples
By the end of this article you will be able to create barcodes in QR and PDF417 format. Have a look at below samples:
A QR code of 200px by 200px, with the content ‘testing’.
URL: https://utils.passkit.net/barcode?m=testing&f=qrcode&h=200&w=200
A PDF417 code of 200px by 50px, with the content ‘testing’.
URL: https://utils.passkit.net/barcode?m=testing&f=pdf417&h=100&w=300
3. Let’s get started – Tech Specification
Note: The article assumes that you have basic knowledge of AWS Lambda, API Gateway & Golang. If you are new to all 3, then I’d recommend you first read the following resources:
System Flow
The image below outlines the system & data flow on what will be built over the course of this article. The final objective is to be able to use this barcode web-service by simply including its URL in an HTML image tag:
The API endpoint will be built according to the following specification:
Sample URL: /barcode?width=200&height=200&type=qr&message=testing
Endpoint: /barcode
Method: GET
Request Parameters:
- width: barcode width (int).
- height: barcode height (int).
- message: barcode contents, UTF8 support (string).
- type: barcode type, ‘qr’ or ‘pdf417’ (string).
For the purpose of this web-service, there are the following limitations:
- Minimum barcode with & height: 150px.
- Maximum barcode width & height of: 3000px.
- Maximum length of barcode contents: 600 bytes.
- Barcode types that are supported: QR, PDF417.
4. The Lambda Function in Go
Code Repository
The code repository with the sample code can be downloaded from Github:
https://github.com/pkosterman/aws-lambda-barcode-generator
Code Structure
Essentially, the lambda consists of a simple Node.js function that spawns off a child process which executes a compiled Go binary. The Node.js function ensures it passes the Stdin & Stdout to the Go binary, so that the function receives the Lambda Context & Event JSON, and when it’s finished, it can write the output back to Stdout for the Lambda to pass back to the invoker:
There are 3 important parts in the code repo:
- main.go: this contains the actual barcode generation (wrapped in our Node.Js wrapper).
- lib/nodewrapper/nodewrapper.go: this library marshalls input from/to the stdin & stdout between our Go function and the Node.Js Lambda function.
- index.js & build.sh – the build script needs to be executed in order to compile our zipped Lambda Node.Js bundle
For this article, we will mainly focus on item 1 – the main.go program. If you want to re-use the nodewrapper for another project, you can simply do so by changing the contents of the Handler function, and, renaming the executable file in index.js to the name of your compiled binary.
Barcode Generation
Let’s have a look at main.go. At the top it lists the libraries that the function uses. Quite basic:
[js]
import (
"bytes"
"encoding/base64"
"encoding/json"
"fmt"
"image/png"
"os"
"aws-lambda-barcode-generator/config"
"aws-lambda-barcode-generator/lib/nodewrapper"
"github.com/boombuler/barcode"
"github.com/boombuler/barcode/pdf417"
"github.com/boombuler/barcode/qr"
)
[/js]
The function uses an existing barcode library for Go, since it’s well maintained, reasonably fast, and works like a charm! For the rest it uses standard Go libraries.
After the import statement, there is the LambdaInput struct – this is the struct that will be used to Marshall the Lambda eventJSON into. This struct conforms to our API endpoint specification, since this is all the data that is required to generate a barcode:
[js]
type LambdaInput struct {
Width *int `json:"width,omitempty"`
Height *int `json:"height,omitempty"`
Message *string `json:"message,omitempty"`
Type *string `json:"type,omitempty"`
}
[/js]
All of the fields in the struct are pointers so that the function can return helpful error messages in case if one of them isn’t present (i.e. nil).
If you were to use this code to perform some different action with a Lambda (let’s say send an SMS message), then this is where you would specify the fields that you expect in your Lambda eventJSON.
Next, lets have a look at the main() function:
[js]
func main() {
nodewrapper.Run(func(context *nodewrapper.Context, eventJSON json.RawMessage) (interface{}, error) {
// declare this functions variables
var input LambdaInput
var c barcode.Barcode
var err error
if err = json.Unmarshal(eventJSON, &input); err != nil {
// Add error prefixes to all final error strings to allow for AWS API Gateway regex
return nil, fmt.Errorf("400 Bad Request: Invalid Request – cannot marshal JSON input. Object received: %s", string(eventJSON))
}
// ensure our input is valid and contains all the data we need
err = checkValidRequest(input)
if err != nil {
return nil, err
}
// based on the barcode type – generate the barcode
switch barcodeType := *input.Type; barcodeType {
case "qr":
c, err = qr.Encode(*input.Message, qr.M, qr.Unicode)
case "pdf417":
c, err = pdf417.Encode(*input.Message, 3)
}
if err != nil {
return nil, fmt.Errorf("500 Server Error: Could not generate barcode. Details: %s", err)
}
// Scale the barcode to the provided width & height
c, err = barcode.Scale(c, *input.Width, *input.Height)
if err != nil {
return nil, fmt.Errorf("500 Server Error: Could not scale the barcode to input width and height. Details: %s", err)
}
// if we have develop set to true, then also export as PNG (so its easy to view the barcode output on local machine)
if config.DEVELOP {
// create the output file
file, _ := os.Create("code.png")
defer file.Close()
// encode the barcode as png
png.Encode(file, c)
}
// write image to buffer
buf := new(bytes.Buffer)
err = png.Encode(buf, c)
if err != nil {
return nil, fmt.Errorf("500 Server Error: Could not write image to buffer. Details: %s", err)
}
// return the image as a base64 encoded string
return base64.StdEncoding.EncodeToString(buf.Bytes()), err
// append true here, so the nodewrapper returns our data without trying to marshall it into any response object
}, true)
}
[/js]
The function validates the input struct, and then uses the struct to generate a barcode according to the API specification. It then returns the barcode as a base64 encoded string, which the Lambda will pass onto API Gateway.
You can see from the code that all errors are prefixed with their HTTP status code. This will later-on make it easy for API Gateway to do the proper HTTP header mapping.
One important point to note. If you want to re-use this code for some other Lambda logic, all your code should go into the Nodewrapper.Run handler function:
[js]
func main() {
nodewrapper.Run(func(context *nodewrapper.Context, eventJSON json.RawMessage) (interface{}, error) {
// CODE GOES HERE
}, true)
}
[/js]
Based on the required output (JSON, or raw), the rawOutput boolean can be either true or false.
Building the Lambda deployment package
All that is required, is to open the terminal, and cd into the root directory of the repo, then type:
[js]
./build.sh
[/js]
This will create a build folder with in there the lambda.zip file. This zip file contains the compiled Go binary, and the index.js code that executes this binary.
If the build succeeded, then the result is something like this:
[js]
Cleaning build folder
Setting Production Mode
Compiling for Linux
Preparing Lambda bundle
adding: main (deflated 65%)
adding: index.js (deflated 61%)
Cleaning up
Done!
[/js]
Next, we need to upload the zipped deployment package to AWS.
Upload the Lambda
Login to your AWS account, and navigate to Lambda.
1. Create a new function:
2. Click ‘Author from scratch’:
3. Click next on the ‘Triggers’ page. We will setup API Gateway later:
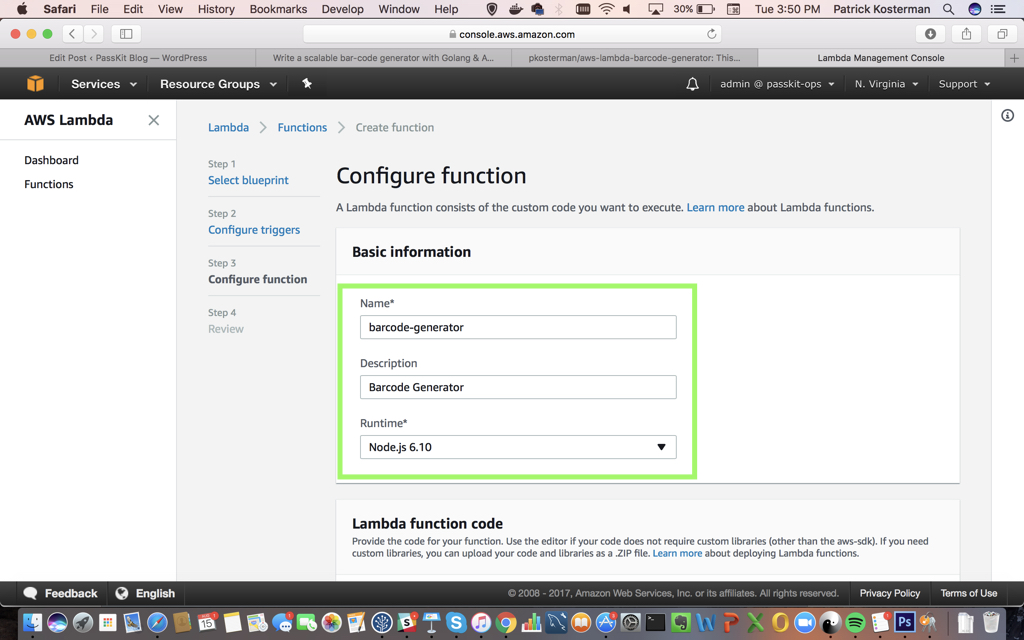
4. Fill out the function details:
For the runtime version, we will pick the latest Node.Js version that Lambda supports (which at the time of writing is 6.10).
5. Upload the lambda.zip that we built in the previous step:
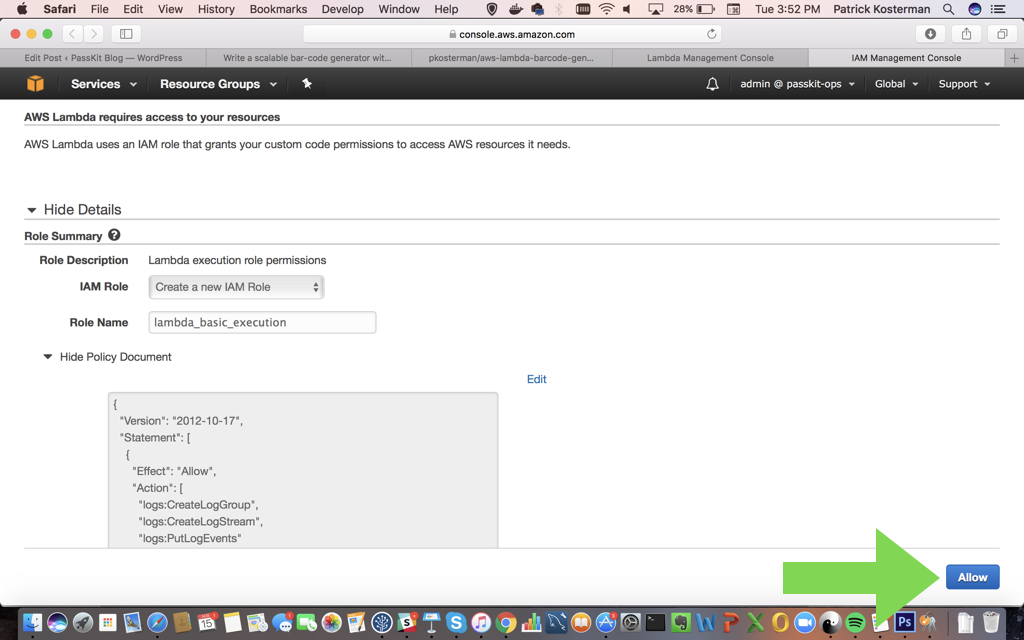
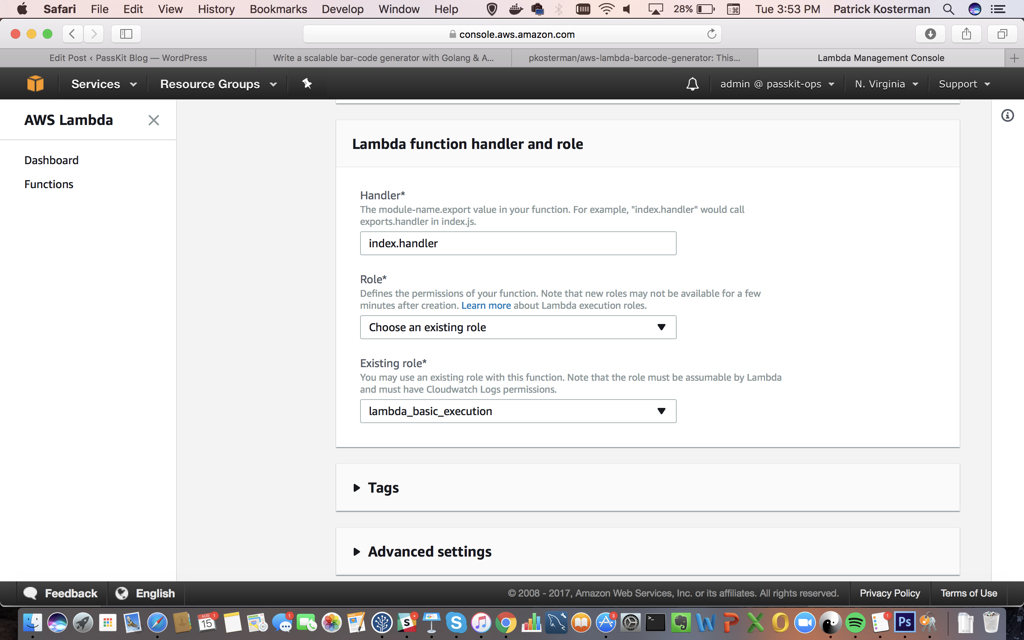
6. Set the role permissions:
All that is needed for this particular lambda to run is the lambda_basic_execution role.
Note: If you plan to write a Lambda that will be accessing other AWS services, then this will not be sufficient enough. In that case you’d have to create a new custom role and add additional permissions for the AWS services that your Lambda will consume.
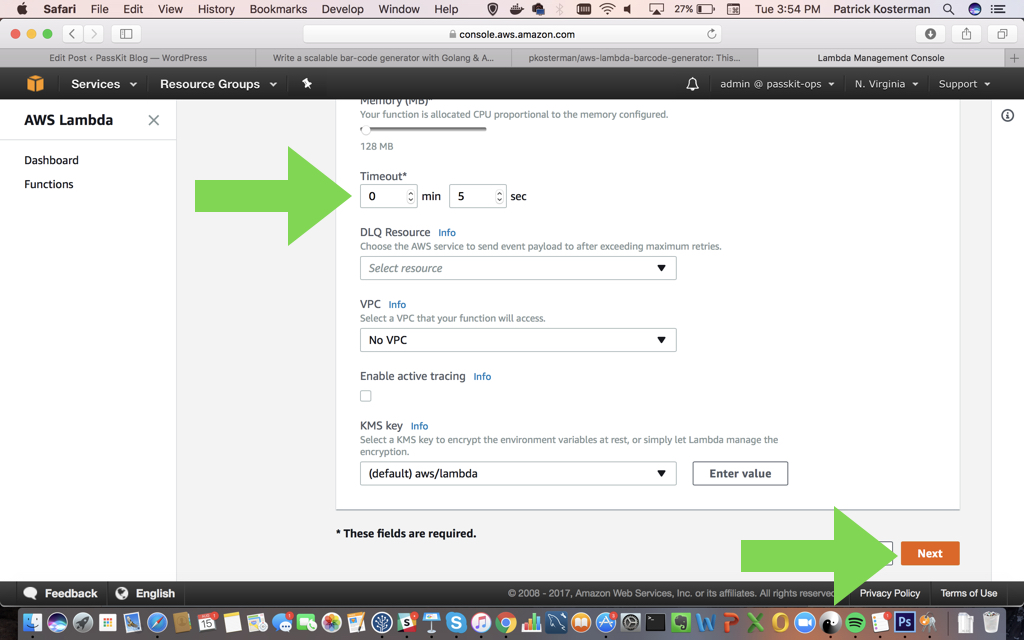
7. Increase the timeout:
By default an AWS Lambda function times out after 3 seconds. For this particular Lambda we don’t need to increase the timeout, since the Go barcode generation is reasonably fast (~10-20ms). But in case you are writing a more complex Lambda, then you might want to change these settings.
8. Check the method summary and create the function:
9. Configure test event and test:
For a successful barode generation, we can test with the following JSON object:
[js]
{
"message": "testing",
"width": 200,
"height": 200,
"type": "qr"
}
[/js]
Tadaaaa – it works:
To test if the error handling works OK, the following JSON object can be used (remember, the function requires a minimum height of 150px for successful generation):
[js]
{
"message": "testing",
"width": 200,
"height": 100,
"type": "qr"
}
[/js]
As expected, this outputs a properly JSON formatted error (including error-code prefix for API Gateway):
The Lambda function is setup correctly!
Next, Part 2: learn how-to setup the API endpoint in API Gateway, so that it can call the Lambda via a GET HTTP request.


